Thursday, 2 April 2015

Carol's Daughter Marula Oil

There was a time I hated using hair oils or any hair products in general because I thought they were all sticky, greasy and would make my hair clump up into hard bits. It wasn't a completely irrational belief since many products that I had tried back then really did have that effect. Years later and several haircare products wiser, I can't imagine what life would be like without them. I've been a fan of a few haircut products from Boots, LaBella and Dove for a while which made me open up to trying more products. Recently I was sent a set of products from Carol's Daughter and I've only tried their Marula Oil so far. It's a part of their Curl therapy range and even though I only have wavy hair with slight curls, this range seems to be working great with it.

Ingredients: I don't really have much to say about the ingredients except that the product is free of silicones, paragons, mineral oils and artificial colors which means i works great with colored hair. At a glance, the ingredients seem to be natural or nature-derived and just generally good for your hair.


Packaging: I love it! The pump dispenser works smoothly and conveniently. The label's are an adorable shade of baby pink mixed with pale marsala (yay for staying in the pantone color of the year theme!) and the font is super cute too! The bottle is small and plastic so it's great to travel with. 
Consistency,Texture, Smell: The oil itself isn't runny. It looks like it has a yellow tint in the bottle but it's clear on your hand. I isn't stickily at all and feels smooth and heavenly to touch. It smells slightly fruity, floral and the only strange word that comes to my mind when I smell it is "vintage". 

Application: I use about 2-3 drops of this oil per application. Pump a few drops out into your hands and spread it through the hair. Be careful not to oversaturate the hair with the oil since a little goes a VERY long way with this product. 

The Marula oil instantly makes my hair calm and glossy (noticeably glossy). I use it only once after every wash and almost never need to reapply it. This product started in a box of products I wasn't sure about even trying and has quickly made it's way into an essential that my hair just doesn't feel right without. Ever since I tried this product, I have stopped using all my other hair serums, oils, creams, sprays etc. I highly recommend this oil for all types of hair even though it only specifies "curls".

Availability and Price: The price differs from store to store and website to website.
Ulta (Available in USA)
Amazon (available everywhere.)
It's easy to obtain the product online if you're located in India or UK. 


Tanaya <3
*This is a pr sample provided for consideration of review. The opinions in this post are unbiased and honest.

Saturday, 14 March 2015

My love affair with Tea Tree Oil! (Apothecary Extracts)

I have been a fan of Tea Tree oil for a few years now and The body shop makes some of my favorite Tea Tree Products. However, I find their bottle of Pure Tea Tree oil really tiny and I decided to try this giant bottle that was sent to me by Apothecary Extracts. Here's a list of how I use my Tea Tree oil and these can serve as ideas for you! I have combination skin which can get dry in some patches at times but is mostly quite oily. The excess oil produced by my skin and sometimes even the mattifying makeup I use results in breakouts occasionally. I found that Tea Tree oil helps balance the sebum produced by my skin and makes it softer. It also helps fight the dark spots left behind by breakouts.

In a Face Mask: I have a favorite Tea Tree Mud Mask (I forgot which brand it is but I'm sure many brands probably make this) that I use regularly. since this mask can get quite dry in the pot, I take the quantity I require for one application and add a few drops each of water and tea tree oil to liquefy it a bit. I apply a smooth layer all over my face and then go over particular problem areas with a little extra. Wait till the mask completely dries so the tea tree oil has had time to absorb into your skin and then wash it off!


In a night cream: I used to mix a few drops of tea tree oil in my favorite night cream (it was a toning cream with cloves) and apply it every night before I go to bed. It's the perfect amount of hydration and smells divine! However, since I'm testing out a new night cream for an upcoming review, I haven't done this in a while.

By itself: Dilute a few drops of tea tree oil in coconut oil and apply it in spots with a Q-tip on blemishes and breakouts.


While I do like the Apothecary Extracts Tea Tree oil, I didn't quite see results as powerful as I do with the one from the body shop. However, this might just be because the body shop probably adds other ingredients in their oil and this one is 100% pure. I recommend this bottle if you're trying out tea tree oil in a face mask or night cream but not by itself.

Do you use Tea Tree Oil or have you used it in the past? I want to know all about your experience so share with me in the comments below! 

Tanaya


*Sample sent for review. All opinions expressed in this article are honest and unbiased.

Tuesday, 27 January 2015

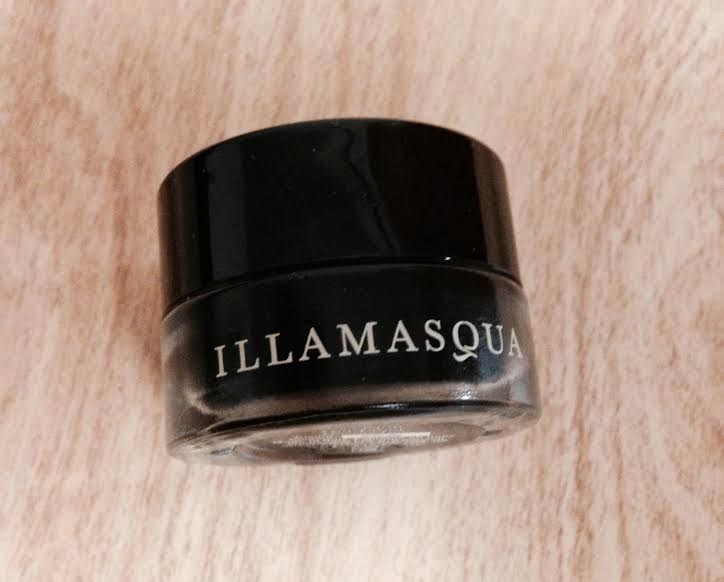
Illamasqua Eyeliner Review


I recently ran out of my usual MAC Gel Eyeliner and I'm glad I did because it finally forced me to try the new Illamasqua one I had been refusing to open for a while. This one's in the shade Infinity and it's the blackest black gel eyeliner I've yet tried! It applies pretty well but I need to get myself a better brush since I lost the last one I had. A good eyeliner brush can make all the difference.

Texture: No surprises here. It's a gel. It's very soft but still has the right amount of firmness to be applied without running. It leans on the dry side which means it dries quickly on the lid and barely smudges compared to all the other gel eyeliners I've tried so far. Gel liners are never as smudge-proof as liquid ones but so much easier to apply so I tend to pick gel over liquid for more elaborate looks.
Removal: It my look dark and smudge-proof but it comes off pretty easily with makeup remover. I've used the neutrogena makeup removing wipes as well as my The Body Shop Camomile makeup remover and they both work well.
Below I've added 2 images. One is in B/W to highlight the eyeliner since I wore a very thin, barely-there line for a natural look. The other is in normal light so that you can see the effect it has.

Illamasqua Gel Liner (Infinity), Brushed through brows, no eyeshadow, no concealer.
I've also begun using the Illamasqua Shadow in Jules for defining my brows but I'll do a detailed review for that in another post.
Cost: £18.50/$28.06/INR1724.50 on the official website. It can possibly be found for less on another website and on sale in different countries. To be honest, I find that quite expensive but with a brand like Illamasqua I wouldn't expect any less. I've wanted to try a product from their collections for so many years now considering they're so well-known and well-love in the makeup-world but their price-tags are what kept me from trying their products for so long.

Final Verdict: If you use eyeliner everyday and it's the one product you would like to invest in, go for it! However, if you would rather spend on something else (like their highlighters which are next on my wish list) then skip it and opt for a drugstore brand instead.

I hope this review helped you pick your next eyeliner or introduced you to the wonderful line of Illamasqua! Let me know what you think in the comments below. Have you tried this product before?


Tanaya <3

*Product gifted by Illamasqua for review. The opinions expressed in this post are honest, unbiased and entirely my own.

Monday, 17 November 2014

Wedding/ Event Manicure Ideas

I've been posting less frequently and there's a crazy amount of things happening right now. If you didn't hear about it yet, I launched a new fashion label! It was primarily just accessories but the spring/summer 15 collection is set to have lots of clothing and beautiful shoes so stay on the look out. You can have sneak peeks of the collection on it's instagram page. I'm also flying back to India this week to attend my cousin's wedding and shopping for the wedding has taken so many months of constant trips to malls and stores and even to different cities. So while my family has been in this festive wedding mood, I thought of writing a post about wedding nail art that can help you guys get ideas for how to dress up for nails whether you're the bride, bridesmaid or guest! The post was published on Real Beauty Spot but since many of you aren't active on the website I thought I should share it here as well.

Glitter it up! : Glitter is the easiest way to make your nails look wedding-ready. Rose Gold has been in trend for a while and isn’t leaving any time soon so it’s a good medium if bright silver or gold is too loud and tacky for your taste. Holographic glitter also looks beautiful if you’re planning on wearing white or dark shades like navy blue, deep green, etc. 
Match your colors and prints: This looks like the new trend in bridal nails and it’s definitely the most fun one. Matching the colors and prints of your gorgeous traditional outfits with nails is pretty easy since it doesn’t require coming up with new patterns. However, since drawing patterns on a nail requires some serious skill you might want to get it done professionally. There are quite a few ways to rock this trend. 
Metallic Overlays: Having a plain base color that’s either the same as the color of your outfit or a pretty contrast works well. The base can be either glossy or matte (since matte nails were all over the spring/summer15 runways it might be a great option). The pattern is drawn over the top with a pretty metallic color that complements the sparkles and work on your outfit. 
Accent Nails: Accent nails came into trend sometime last year, have been around for over a year and are definitely here to stay for quite a while more. They’re a good way to add some whimsy to your manicure while still staying subtle. 
Get Fancy with some DIY: “Nail Jewelry” is a new concept and can be bought easily online and is quite pocket-friendly too. Some of it is even reusable! Get a few pieces that flatter the patterns on your outfit and you’re guaranteed a compliment every time you shake someone’s hand. 
Nail decals and stickersNail art stickers are one of the most fun and easy nail art tools around. The really great thing about these stickers is that they come in a whole range of different designs and are easy to apply.
If you're in India or in any other country with easy access to a store that sells fancy Indian bindis you can also get creative and use some pretty bindis to decorate your nails. Buy a pack in a pretty design and stick them onto your nails once the base color coat is done. Add some top coat and you’re done! It is an easy way to avoid placing fussy little crystals and doesn’t require the patience that doing “real” nail art requires. 

I would love to know if this post helped you get ready for a wedding or any other event and if any of these ideas were part of your wedding look tweet me a picture of tag me on your instagram post! I would love to see pictures of your nail art looks even if they aren't inspired by this post. Leave me cute comments below and be sure to follow me on instagram and like this blog on Facebook

Thursday, 16 October 2014

Hair Chalking for Dark Hair

Hello There!

So a little while ago I wrote an article about Hair Chalking for Dark Hair for Real Beauty Spot and thought it would be nice to share the article here as well. These tips would work for anyone with darker hair colors like dark red, brown, auburn, black, etc. Hair Chalking is a great way to add some temporary color to your hair. It's also the best way to try mermaid hair tips after your hairdresser refuses to do it with permanent color for fear of damaging your hair! That really happened to me and hair chalking wasn't a thing back then so I finally get to live my dreams...Haha.

"....

Hair Chalking DIY – How To Hair Chalk

Step 1: Choose your colors. While dark blues, greens and reds may look adorable in the pictures online, most of them don’t show up that well on dark hair so pick carefully. Go for brighter shades such as a bright teal, bright blue, yellow, or pink. Pastels look wonderful if they show up but that depends on the kind/brand of chalk you use too.
Step 2: Soak the chalk. Fill an empty pill-box, color pallet or spoons with some water and dip one end of the chalk in them. Drip a few drops of water over the top if you think the chalk isn’t soaking up the water on it’s own. This will help release the pigments.
Step 3: Soak Yourself! While the chalk(s) is/are soaking, hop into the shower and wash your hair. Use a clarifying shampoo that will remove the excess oil in your hair but skip the conditioner (that greasy stuff doesn’t let the pigments stick). Towel dry but not too much and change into an old tshirt because it may get dirty.
... Click here to read the entire article! 
PS: I know it might be annoying to be led to another page for the article but I hope I've sparked your curiosity enough to make you go check it out. Real Beauty Spot, being a different website that isn't owned by me, prevents me from posting the complete article here but I'm sure you'll find it worth the trouble. 
Let me know what you think and if you've ever chalked your hair in the comments below. I would love to see pictures of your hair chalking attempts on twitter/Instagram so tag me! 

Love,
Tanaya <3

Wednesday, 1 October 2014

Argan Dew Giveaway!


Hello there!

I'm finally posting this giveaway here on the blog. It is already active on Instagram. As you know, Argan Dew is a brand I've previously blogged about and their replenishing hair mask has quickly made it's way into my haircare routine. I initially tried a few samples of their products which is what made me fall in love with the hair mask and discover their brand. Since I can't imagine going a day without my Argan Dew Replenishing Hair Mask, I really wanted you guys to try it too and hence this giveaway. Argan Dew will be sending out the prizes directly. The giveaway is open to all USA and India residents.

5 winners will be picked. 3 from Instagram and 2 from here. You can enter on both places and to increase your chances of winning. To enter the giveaway on Instagram go here.

To enter through my blog, enter below.

a Rafflecopter giveaway

Comment below to let me know if you entered! :)

Tanaya <3

Thursday, 18 September 2014

My Winter Skincare Must-have : Coconut-Argan Body Oil

Summer seems to be on it’s way out all too soon and the temperatures are dropping so quickly! I thought it’s time to start talking about fall/winter essentials and so here’s my first essential. While the skin on my face is in it’s best condition during winter, I know it’s strange, the skin on my legs and hands gets dehydrated and dry. Having oily skin made me hate heavy moisturizers and oils for my face and unfortunately I couldn’t bear to think of applying them on my body either. However, if there’s one ingredient I would trust with moisturizaton it’s Argan Oil. I decided to give this body oil by emerginC because it has coconut and argan oil in it- a combination that I’ve never seen before in any other product.
Packaging: It comes in a spray bottle, which looks pretty ordinary. The different shades of green on the bottle look cute. Ignore the awkward sheet of cling film/plastic wrap on my bottle. I was traveling with this bottle and didn’t want it to leak.

Texture: The product feels like an oil (obviously) but it isn’t sticky at all. In fact it gets absorbed into the skin so quickly that you hardly have time to realize that it’s oil.

Fragrance: It is not fragrance-free. It definitely has a smell and not everyone may like it but I love it. It smells like herbs and something else that I can’t put a name on. It’s a difficult scent to describe but I would say it smells very organic and earthy.


Results: Go get it! This product would make it into my winter-survival kit, my daily-essentials kit, my zombie-apocalypse-survival kit and anything else you can thing of. I love how I can just spray it onto the dry region of my skin and it sinks in instantly. It hydrates the skin better than any moisturizer I’ve ever used and it leaves behind a lovely fragrance that I really like. This product gets a definite 5/5 or 10/10 from me. If you have dry skin I’m pretty sure you could even use it on your face since it’s 100% organic and natural and wouldn’t have any side effects. It’s a definite must-have.

I really hope you'll try this product because I love it so much and that this post was helpful. Let me know what you think in the comments below and if you can recommend any winter beauty essentials. 

Tanaya <3

Trending Articles

LinkWithin

Related Posts Plugin for WordPress, Blogger...